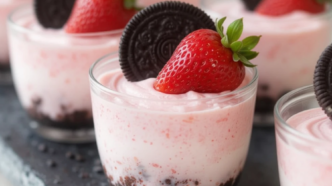
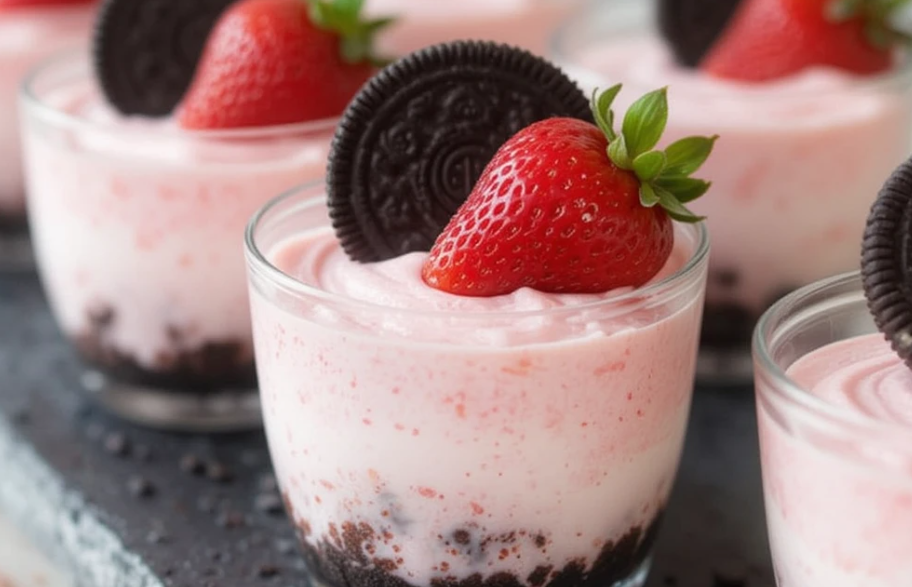
When it comes to indulgent, effortless desserts that wow on both flavor and presentation, Cups of Strawberry Oreo Cheesecake stand in a league of their own. This no-bake dessert combines the rich, creamy essence of cheesecake with the irresistible crunch of Oreo cookies and the fresh, fruity sweetness of strawberries. Served in individual cups, they are not only convenient and elegant but also perfect for portion control, parties, or a cozy night in.
Why These Cheesecake Cups Are a Must-Try
No-bake Strawberry Oreo Cheesecake Cups offer a perfect balance of textures and flavors. The base is a buttery Oreo crust, followed by a silky smooth cream cheese layer, layered with luscious strawberry filling or fresh berries, then topped with whipped cream and garnishes.
These dessert cups are:
- Quick and easy to prepare – no oven needed
- Perfect for make-ahead servings
- A hit at birthdays, baby showers, dinner parties, or picnics
- Customizable for various tastes and occasions
- Visually stunning in clear dessert cups or jars
Ingredients You’ll Need
Here’s what you’ll need to create this no-bake masterpiece. The ingredients are easily accessible and can be assembled in under 30 minutes:
For the Oreo Crust Base:
- 18 Oreo cookies, crushed finely (use whole cookies with cream)
- 4 tablespoons unsalted butter, melted
For the Cheesecake Filling:
- 2 packages (16 oz total) cream cheese, softened
- ½ cup powdered sugar
- 1 teaspoon vanilla extract
- 1 cup heavy whipping cream
For the Strawberry Layer:
- 1½ cups fresh strawberries, chopped (or use strawberry compote)
- 2 tablespoons sugar (optional, depending on sweetness of berries)
- 1 teaspoon lemon juice
Optional Toppings:
- Whipped cream
- Mini Oreos or crushed Oreo crumbs
- Fresh strawberry slices
- Mint leaves for garnish
How to Make Strawberry Oreo Cheesecake Cups
Step 1: Prepare the Oreo Crust
Crush Oreo cookies into fine crumbs using a food processor or a rolling pin. Combine with melted butter and stir until the texture resembles wet sand.
Spoon 2–3 tablespoons of the mixture into each dessert cup. Press down firmly to form a compact base. Refrigerate while you prepare the filling.
Step 2: Make the Cheesecake Filling
In a large mixing bowl, beat the softened cream cheese until smooth and creamy. Add powdered sugar and vanilla extract. Mix until fully combined.
In a separate bowl, whip the heavy cream until stiff peaks form. Gently fold the whipped cream into the cream cheese mixture until well incorporated. This creates a light, airy texture without baking.
Step 3: Create the Strawberry Layer
If using fresh strawberries, mix them with sugar and lemon juice. Let them macerate for 10–15 minutes until juicy. For a smoother texture, lightly mash them or create a quick compote by heating them gently on the stove for 5–10 minutes.
Step 4: Assemble the Cups
Remove the crust cups from the fridge. Layer them as follows:
- Add a generous layer of cheesecake filling over the Oreo crust.
- Spoon a layer of the strawberry mixture or compote on top.
- Repeat if using tall cups or jars for a beautiful layered effect.
Top with whipped cream, a sprinkle of crushed Oreos, and a strawberry slice for presentation.
Step 5: Chill and Serve
Refrigerate for at least 2–4 hours or overnight to set. This allows the flavors to meld and the texture to firm up beautifully.
Serve chilled and watch your guests swoon with every spoonful.
Expert Tips for Perfect Cheesecake Cups
- Use room temperature cream cheese to avoid lumps.
- Whip the cream separately to ensure the filling is light and fluffy.
- Layer with care for a clean, professional presentation—use a piping bag for the cheesecake filling if desired.
- Prep ahead: These cups can be made 24–48 hours in advance and stored in the fridge.
- Add gelatin if you prefer a firmer set cheesecake, especially in warm environments.
Variations and Flavor Twists
Chocolate Strawberry Cheesecake Cups
Add melted dark chocolate to the cream cheese filling for a rich twist. Layer with sliced strawberries and drizzle with chocolate syrup.
Strawberry Lemon Cheesecake Cups
Add a touch of lemon zest to the cream cheese mixture and mix strawberries with lemon curd for a zesty version.
Vegan or Dairy-Free Version
Use plant-based cream cheese, coconut cream, and vegan cookies for a dairy-free alternative. Sweeten with maple syrup or agave nectar.
Other Fruit Options
Swap strawberries for blueberries, raspberries, mango, or cherries. Use fresh or frozen fruit depending on availability.
Why These No-Bake Cheesecake Cups Work So Well
These cheesecake cups are a fusion of flavor and function. They’re portioned individually, making them easy to serve, transport, and store. The no-bake method saves time and energy while still delivering the richness and elegance of a classic cheesecake.
Strawberries and Oreos make an irresistible combo that appeals to both kids and adults. The balance of crunch, creaminess, and fruitiness makes every bite exciting and satisfying.
Perfect Occasions to Serve Cheesecake Cups
- Valentine’s Day or Anniversaries
- Birthday parties
- Wedding showers and bridal brunches
- Mother’s Day or Easter desserts
- Holiday potlucks and summer picnics
They also make a thoughtful DIY edible gift, packed in mini mason jars with a ribbon.
Storage and Shelf Life
- Store in an airtight container in the refrigerator for up to 5 days.
- Not recommended for freezing due to the creamy filling, which can change texture.
- Keep chilled until ready to serve to maintain structure and freshness.
Conclusion: The Ideal No-Bake Dessert for All Seasons
Whether you’re hosting a gathering or simply satisfying your sweet tooth, Cups of Strawberry Oreo Cheesecake are a delightful solution. With no oven required, minimal ingredients, and unlimited customization, they are truly the ideal no-bake dessert.
Creamy, fruity, chocolatey, and easy to love—this dessert ticks all the boxes. Try them once, and they’ll quickly become a reliable go-to in your dessert repertoire.